Tomb KV43 is the royal burial of Thutmose IV, an Eighteenth Dynasty pharaoh, situated in the Valley of the Kings on the west bank of the Nile at Thebes (modern Luxor, Egypt). The tomb also contained the remains of two of his children, who predeceased him. Its plan follows the characteristic "dog-leg" layout of earlier Eighteenth Dynasty tombs, featuring a series of descending corridors that turn sharply before reaching the burial chamber. KV43 was rediscovered in 1903 CE by Howard Carter during excavations sponsored by the American lawyer and patron Theodore M. Davis, and it remains a significant source of information for the funerary practices and artistic conventions of New Kingdom royal burials.
Thutmose IV, who ruled during the mid–Eighteenth Dynasty of the New Kingdom, was interred in tomb KV43 in the Valley of the Kings alongside two of his children, Prince Amenemhat and Princess Tentamun. By the reign of Horemheb at the end of the dynasty, the tomb had been robbed and subsequently restored, as recorded in two hieratic graffiti painted on the antechamber wall. The larger inscription, dated to Year 8 of Horemheb, names Maya, an official in charge of royal works, who was commissioned to renew the king’s burial. A second, shorter text identifies Djehutymose, Maya’s assistant, who likely carried out the restoration and also left graffiti in Tutankhamun’s tomb.
Modern excavations rediscovered KV43 in 1903 when Howard Carter, excavating for Theodore M. Davis, followed alabaster fragments bearing Thutmose IV’s name up a small valley. Upon reaching a leveled bedrock platform, Carter uncovered foundation deposits containing model alabaster vessels and other tools, confirming the tomb’s identity. Inside, Carter noted evidence of ancient robbing — including a palm-fiber rope left in the pillared hall — and signs of resealing, with seals bearing both Horemheb’s and necropolis emblems.
Architecturally, KV43 follows the dog-leg plan of earlier royal tombs like KV35 but is more precise in its execution. Three descending corridors lead to a deep well, then turn into a pillared hall, antechamber, and burial chamber, which features a sunken crypt for the sarcophagus and magical niches that would become standard in late Eighteenth and early Nineteenth Dynasty royal tombs. Four symmetrical storerooms surround the burial chamber, underscoring KV43’s importance as a transition in royal funerary design.
circa 1390 BCE

The tomb’s design and spatial organization closely follow that of tomb KV35, constructed for Amenhotep II, father of Thutmose IV, yet exhibit greater precision in its execution and axial alignment. The first three corridors descend toward a deep shaft containing a subsidiary chamber at its base. Beyond this well, the main axis of the tomb turns at a right angle, leading into the first pillared hall. From this hall, a staircase and sloping corridor continue toward the antechamber and burial chamber. Distinct from KV35, the rear section of the burial chamber is lowered to form a recessed "crypt" intended to receive the sarcophagus. An innovative feature is the inclusion of magical niches, a design element that appears subsequently in all royal tombs of the later Eighteenth Dynasty and early Nineteenth Dynasty. Furthermore, four storerooms are symmetrically arranged on either side of the burial chamber.
circa 1390 BCE

Entryway A
Entryway A measures 8.25 metres in length and 2.3 metres in width. A roughly cut and unfinished staircase descends at an angle of approximately 25 degrees. Beam holes are visible on either side of the undecorated stepped descent. A hole on one wall corresponds to a slot on the opposite wall; one end of a wooden crossbeam was inserted into the hole and swung across to fit into the slot. A rope tied to this beam enabled large, heavy objects—such as the sarcophagus—to be lowered safely into the tomb.
circa 1390 BCE

Corridor B
Corridor B extends for 11.04 metres, with a width of 1.98 metres and an approximate height of 2 metres. This undecorated corridor provides direct access from Entryway A.
circa 1390 BCE

Descent C
Descent C measures 4.3 metres in length and 2 metres in width. The walls contain narrow niches, and the descent incorporates fourteen damaged steps at an incline of approximately 35 degrees.
circa 1390 BCE

Corridor D
Corridor D is 8.19 metres long, 2 metres wide and approximately 2.2 metres high. It slopes downward at an approximate angle of 17.1 degrees and is undecorated.
circa 1390 BCE

Well Chamber E
Well Chamber E measures 4.32 metres by 4.3 metres with a height of approximately 10 metres. An unexcavated section in the northeastern corner preserves the original floor level before the chamber was extended downward. The exit was intentionally blocked, plastered over and decorated to create the impression of a tomb’s termination. The chamber's ceiling is painted dark blue with yellow stars, and the upper portions of all four walls are adorned with a kheker frieze. Beneath each frieze are two decorative bands and the hieroglyphic symbol for "sky" (Gardiner sign N1) painted in dark blue and filled with a single row of stars.
circa 1390 BCE
Well Chamber Ea
Well Chamber Ea, located at the bottom of Well Chamber E, measures 3.2 metres long by 4.16 metres wide and 2.25 metres high. It is undecorated.
circa 1390 BCE

Pillared Chamber F
Pillared Chamber F is 10.26 metres by 6.15 metres with a height of approximately 2.5 metres. Two centrally placed pillars about 1 metre per side support the ceiling. On the eastern side, a staircase descends eighteen damaged steps at an angle of approximately 43 degrees.
circa 1390 BCE
Corridor G
Corridor G is 8.2 metres long, 1.95 metres wide and approximately 2.25 metres high. It descends at an incline of 26 degrees and remains undecorated.
circa 1390 BCE
Descent H
Descent H measures 2.3 metres by 2.02 metres, reaching 5 metres in height. Fourteen steps descend at an angle of approximately 44 degrees, and narrow niches have been cut high into the side walls. The surfaces are undecorated.
circa 1390 BCE
Chamber I
Chamber I is 5.19 metres long, 3.6 metres wide and 2.2 metres high. The decoration closely parallels that of Well Chamber E on its northern and eastern walls. Thutmose IV is depicted four times on the northern wall and five times on the eastern wall, accompanied by Hathor, Osiris and Anubis. The upper sections of these two walls feature a kheker frieze, with the hieroglyphic symbol for sky below, painted dark blue and filled with stars. The ceiling is similarly painted dark blue and studded with stars. During the last two decades of the 20th century CE, an intruder attempted to cut out the face of Hathor. Two pieces of hieratic graffiti on the eastern wall record the tomb’s inspection around 1298 BCE under the authority of Horemheb. One of these inscriptions indicates that the tomb had already been breached before Horemheb's time, allowing inspectors access to Chamber I.
The first graffito reads: "Year 8, third month of the summer season, under the Majesty of the King of Upper and Lower Egypt, Djeser-kheperu-Ra, chosen of Ra; the son of Ra, Horemheb, beloved of Amon. His Majesty, life, health, strength, ordered that the carrier of the fan at the king's left, the royal scribe, the steward of the Treasury and the steward of works in the Place of … The director of the festival of Amon of Opet in Karnak, Maya, son of the doctor Auy, born of the mistress of the house, Uret, renewed the funeral of King Men-kheperu-Ra, true of voice, in his precious dwelling in Western Thebes".
The second graffito states: "His assistant, the Head of Thebes, Thutmosis, son of Hatiay, his mother Yuh, of the city".
circa 1390 BCE

Burial Chamber J
Burial Chamber J is 14.43 metres by 8.37 metres, with a variable height. The chamber is undecorated and divided into two levels: the upper level is 9.74 metres long and contains six pillars arranged in two rows; the lower level, reached by a short staircase between the last two pillars, is 5 metres long and 1.15 metres wide. Niches intended for magical bricks are cut into all four walls of this lower level, which lies approximately 1 metre below the upper level.
The sarcophagus (inspect) is crafted from red sandstone and measures 3 metres by 1.60 metres by 2 metres. Its exterior is adorned with incised hieroglyphs and figural decoration painted in yellow, white and black. Thutmose IV may originally have been interred here, though the tomb was subsequently cleared, and his body was moved to the royal cache in the tomb of his father, Amenhotep II (KV35), where it was discovered in a side chamber.
circa 1390 BCE
Side Chambers Ja-Jd
Side Chamber Ja measures 3.11 metres long, 5.16 metres wide and 1.93 metres high; it is undecorated. Side Chamber Jb is 3.12 metres long, 5.16 metres wide and 1.91 metres high; it is undecorated, and its doorway has been blocked. Side Chamber Jc measures 2.83 metres long, 4.15 metres wide and 1.93 metres high. Side Chamber Jd is 3.17 metres long, 5.17 metres wide and 2 metres high.
circa 1390 BCE

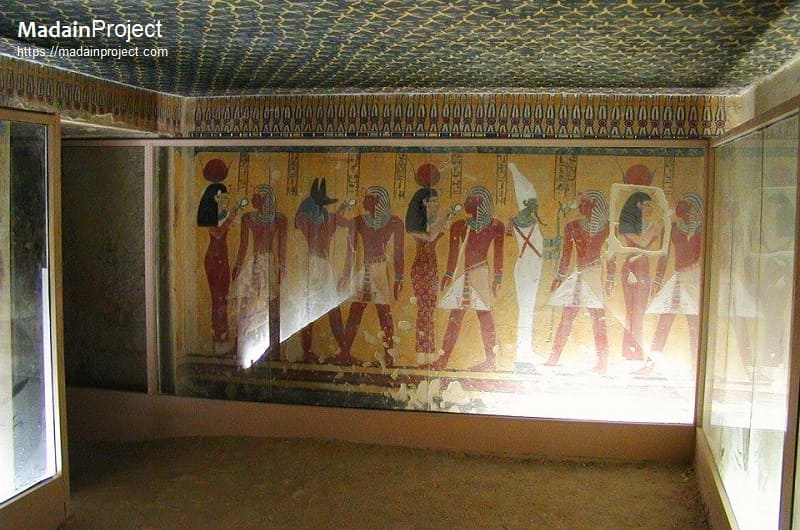
The painted decoration of the tomb is limited to only two locations: the upper section of the well shaft and the antechamber. In both spaces, the ceilings are adorned with yellow stars against a deep blue background, a motif that symbolically evokes the nocturnal sky and the eternal cosmos. The walls of the well shaft present a partial decorative cycle: both upper registers begin with a kheker-frieze, beneath which one completed wall depicts Thutmose IV in ritual proximity to Osiris, Anubis, and Hathor, while the opposing wall contains a less fully realized scene showing Anubis. The latter appears unfinished, suggesting that work ceased abruptly, possibly due to the king’s death.
The antechamber continues this decorative scheme, although only two of its walls are painted. These surfaces repeat the standard royal iconography of the king presenting himself before a series of major deities — again including Osiris, Anubis, and Hathor — reinforcing the tomb’s theological emphasis on royal regeneration and safe passage into the afterlife.
Notably, the painted decoration has sustained modern damage. In the late twentieth century CE, an intruder attempted to excise the face of Hathor from the east wall of the antechamber, leaving visible scars that have not been repaired. This vandalism underscores the ongoing threats to the integrity of New Kingdom tombs and complicates conservation and interpretive efforts.
In contrast to the decorated well and antechamber, the burial chamber itself is entirely undecorated. This absence of ornamentation is most likely a direct result of Thutmose IV’s sudden death, which would have curtailed further decoration and ritual completion of the royal sepulcher. The lack of iconography in this most sacred chamber is a notable divergence from the conventionally rich decoration seen in other royal tombs of the Eighteenth Dynasty and underscores the interrupted state of the king’s funerary preparations.
circa 1390 BCE

Human Remains
Although the burial originally contained the body of Thutmose IV, the king’s mummy had been removed during antiquity and was eventually rediscovered five years earlier among the royal mummies cached in KV35. The only human remains actually present in the tomb were those of a young boy found unwrapped and propped up against the wall in Side Chamber Jd. This boy is most probably Prince Amenemhat, whose canopic jars were also recovered. The canopic jars of a Princess Tentamun were additionally discovered in the tomb, indicating that she too was once interred alongside her father.
Sarcophagus
The king’s red sandstone sarcophagus remained in situ in the burial chamber. It is covered with texts and figures filled with yellow pigment. Both the lid and the box have a rounded head end and a squared foot end. Nephthys is depicted at the head end, with her arms raised, while Isis, similarly posed, is shown at the foot end. The long sides bear scenes of the king with Anubis, accompanied by inscriptions. The lid had been carefully propped up beside the sarcophagus itself, supported by a series of stone slabs and the carved wooden head of a cow.
Chariot and Associated Equipment
Within the pillared chamber F, excavators also found the wooden body of a chariot, now preserved at the National Museum of Egyptian Civilization, which had once been covered in silver leaf and decorated with scenes of the king slaying his enemies. Accompanying this was an archer’s gauntlet made of red and green leather and portions of a colorful tapestry-woven garment bearing the name of Amenhotep II.
Other Funerary Items
A range of additional objects was present across the tomb and its side chambers. Black-painted wooden statuettes of the king were recovered, along with fragments of stone vases, broken fan handles, and sections of a cedar-wood throne. Examination of the side chambers revealed further assemblages: Chamber Ja contained only a mass of linen wrappings. Chamber Jb held meat and birds prepared as funerary food offerings. Chamber Jc contained a substantial quantity of grain and broken storage jars. Chamber Jd yielded a large number of faience shabtis and amulets, along with broken faience vessels and the mummy of Prince Amenemhat. There were no visible traces of blocking walls at the entrances to these side chambers, suggesting they had originally been closed by wooden doors; evidence for this includes sockets and a wooden lintel at the entry to Chamber Ja. However, all wooden closures have long since been looted.
Foundation and Associated Deposits
Also associated with the burial are a number of items placed in the tomb’s foundation deposits, including model alabaster vases (inspect). Decorative chair arm panels belonging to Thutmose IV, now in the Metropolitan Museum of Art, depict the king as a sphinx trampling enemies in one scene and seated alongside Thoth and a lioness-headed goddess in another. Faience shabtis and amulets (inspect), a hes-vase, and other similar small objects — also housed at the Metropolitan Museum — further testify to the richness of the tomb’s funerary assemblage.


Signup for our monthly newsletter / online magazine.
No spam, we promise.
The Madain Project is an online archive of Abrahamic History and Archaeology.
Abrahamic History & Archaeology is the study of history and archaeology with respect to the three Abrahamic Faiths without considering the religious and theological aspects. The goal of Abrahamic History is to understand how and why the religious doctrines and behaviours have evlovled and changed over time. Searching for patterns in the evolution of significant cultural events such as the development of farming, the emergence of cities, or the collapse of major civilizations for clues of why and how these have influenced the three major Abrahamic religions.
Cloud Drive -
About -
Help -
Editorial Policy -
AI Policy -
Privacy Policy -
Contact
Madain Project: Encyclopedia of Abrahamic History & Archaeology.
Copyright MadainProject 2017 - 2026.
![]()
![]()
![]()
![]()
![]()
![]()