Hadrian's Wall (Vallum Hadriani), was an ancient Roman period defensive fortification of the Roman province of Britannia. The constrcution on the wall began in 122 CE under Emperor Hadrian. It ran from Wallsend on the River Tyne in the east to Bowness-on-Solway in the west of what is now modern day northern England. Historically it was also called the "Roman Wall", Picts' Wall, or in Latin Vallum Aelium as well.
The Hadrian's Wall was a sophisticated system of defense comprising of a stone wall with large ditches in front and behind, stretching across the whole width of the island. Soldiers were garrisoned along the line of the wall in large forts, smaller milecastles, and intervening turrets. In addition to the wall's defensive military role, its gates may have been customs posts.
Hadrian's Wall was likely conceived before Hadrian's visit to Britannia in 122 CE, with inscriptions from as early as 118–119 CE indicating his intent to secure the empire's borders. Its construction was influenced by widespread unrest across the empire, including in Britannia, and aligned with Hadrian's broader policy of consolidating Rome's frontiers rather than expanding them. Unlike traditional Roman limes, the wall was a continuous barrier, leading some scholars to speculate about external influences, such as China's Great Wall. However, others argue that Rome had a long tradition of fortified borders without requiring such distant inspiration.
The primary function of the wall was to deter raiders and regulate movement, serving as both a defensive and administrative structure. It slowed enemy incursions, allowing time for reinforcements to respond, while also controlling trade, migration, and taxation through its gates. Beyond its practical role, Hadrian's Wall was a potent symbol of Roman authority, marking the boundary between the empire and the unconquered north. Some evidence suggests it was originally whitewashed, making it a striking visual statement of imperial power. While its long-term strategic necessity is debated, it remained a defining feature of Roman Britain for nearly three centuries.

circa 122 CE

Hadrian's Wall stretched westward from Segedunum (Wallsend) on the River Tyne, passing through key locations such as Carlisle and Kirkandrews-on-Eden, before reaching the Solway Firth. The exact western terminus remains uncertain, but it lay slightly beyond Bowness-on-Solway.
The wall's path closely followed, but remained north of, the Stanegate, a pre-existing Roman road established several decades earlier. This road linked the strategic forts of Corstopitum (Corbridge) on the River Tyne and Luguvalium (Carlisle) on the River Eden, both vital to the security of northern Britannia. Today, the A69 and B6318 roads trace much of Hadrian's Wall's route from Newcastle upon Tyne to Carlisle, before continuing along the Cumbrian coast near the Solway Firth.
In its central sector, the wall takes advantage of the Whin Sill escarpment, utilizing the sheer cliffs as a natural defense. This elevated position provided Roman sentries with expansive views over the frontier zone, reinforcing its role as both a defensive structure and a deterrent.
Although the stone curtain wall itself ends near Bowness-on-Solway, the Roman defensive network extended further. The system of milecastles and turrets continued along the Cumbrian coast as far as Risehow, south of Maryport. West of Bowness-on-Solway, these structures are categorized separately and referred to as Milefortlets, indicating a continuation of Rome's defensive presence along the coastline.
circa 122 CE

The architecture of the Hadrian's Wall exhibits variations in construction, with both broad (2.9 meters) and narrow (2.3 meters) sections, suggesting a change in plans, likely due to resource constraints. Initially, the wall was intended to be built entirely in stone at a uniform width of 10 Roman feet from Newcastle to Bowness-on-Solway, but only three-fifths of it was completed in stone, while the western section was initially constructed from turf before later being rebuilt in stone.
The Narrow Wall emerged when the eastern half's width was reduced to eight Roman feet, reallocating materials to reinforce the western section. Running parallel to the wall for most of its length was the Vallum, a defensive earthwork consisting of a central ditch flanked by two raised mounds, though it was absent between Newcastle and Wallsend, where the River Tyne likely served as a natural barrier. There has been debate over whether the Vallum predates the wall, with early theories suggesting it functioned as an earlier border, but later archaeological findings indicate that both structures were likely built simultaneously.
The western portion of the wall, from Milecastle 49 to Bowness-on-Solway, was initially constructed from turf, possibly due to the absence of suitable limestone, and later replaced with stone in two phases—first during Hadrian's reign and later after the Antonine Wall's abandonment or possibly under Septimius Severus. The turf wall varied in foundation techniques depending on terrain; in boggy areas, wooden piles were used, while in other sections, cobblestone bases provided stability. The original turf structure was 6 meters wide and 3.66 meters high, with a steeply sloped northern face and a more gradually sloping southern face, reinforcing its role as both a physical barrier and a strategic fortification.
circa 122 CE

Milecastle 49 (Harrow's Scar)
The Milecastle 49, known as Harrows Scar, is a milecastle on Hadrian’s Wall, located immediately west of the River Irthing gorge, near the site where the Willowford Bridge once carried the Wall across the river. The name derives from an ancient tenement, The Harrows, recorded on William Howard’s 1603 map of the Barony of Gilsland and an estate map of The Shaws from around 1800.
Harrows Scar Milecastle measures 19.8 meters (east-west) by 22.9 meters (north-south) and features narrow-gauge defensive walls, bonded with the Narrow Wall curtain of Hadrian’s Wall on either side. It has Type III gateways and lies 1,458 meters west of Milecastle 48 (Poltross Burn) and 1,391 meters east of Milecastle 50 (Birdoswald). Excavations in 1898 and 1953 (led by I. A. Richmond) uncovered traces of an earlier Turf Wall milecastle (49TW) beneath the stone structure. The site is managed by English Heritage and was designated a Scheduled Monument (No. 13987) on 14 July 1997.
Each milecastle along Hadrian’s Wall had two associated turrets positioned roughly one-third and two-thirds of a Roman mile west of the milecastle, likely serving as observation posts manned by the milecastle’s garrison. Turret 49A (TW), constructed during the Turf Wall phase, was later demolished when Birdoswald Fort was built, with remnants discovered in 1945. The turret stood near the fort’s headquarters building but has no visible remains. Turret 49B (Birdoswald), located 340 meters west of Birdoswald Fort’s western rampart, replaced an earlier Turf Wall turret (49B TW), which was dismantled upon the construction of the stone wall. Excavated in 1911, its masonry remains have been consolidated and exposed, offering insight into Hadrianic military architecture.
circa 122 CE

Birdoswald Roman Fort
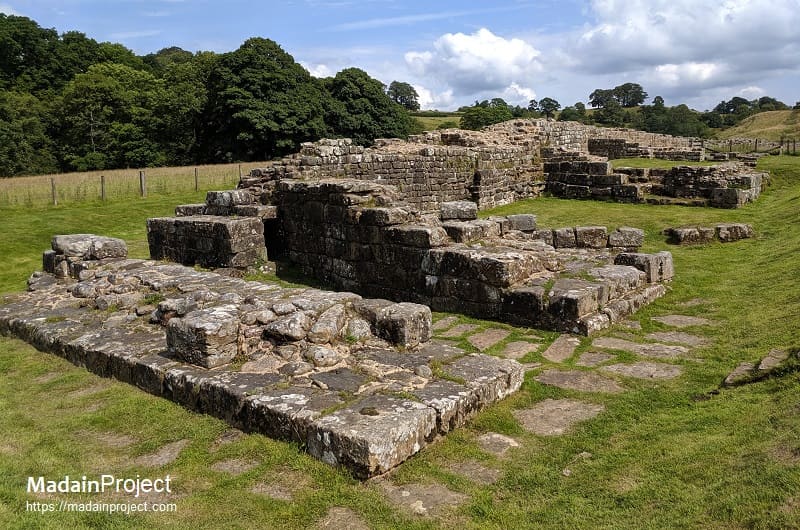
The Birdoswald Roman Fort is a key site on Hadrian’s Wall, notable for its well-preserved remains and archaeological significance. Located in the western sector of the Wall, it originally featured a Turf Wall, later replaced in stone approximately 50 meters further north in the 130s CE to align with the fort’s northern rampart. The reasoning for this shift remains debated, with theories ranging from signaling improvements to geological changes affecting the original route. The fort followed the standard Roman auxiliary layout, including a principia (headquarters building), horrea (granaries), barracks, and an unusual basilica exercitatoria (exercise hall), likely adapted for training in the harsh northern climate. Surrounding the fort were vici (civilian settlements), differing in character depending on their location, as well as a bathhouse in the River Irthing valley and a cemetery to the southeast. Birdoswald was connected to the outpost fort of Bewcastle, with signaling towers facilitating communication.
Nearby, Milecastle 49 (Harrows Scar) and its associated Turrets 49A and 49B formed part of Hadrian’s Wall’s defensive system. Turret 49A was dismantled when Birdoswald Fort was built, while Turret 49B, located 340 meters west of the fort, was later excavated and its masonry consolidated. The remains of Willowford Bridge, which once carried the Wall over the River Irthing, still stand to the east, though river erosion has altered its original structure.
Birdoswald is also significant for its post-Roman occupation, with excavations revealing a continuous settlement sequence from the late Roman period until possibly 500 CE. The site contained timber halls resembling those found elsewhere in post-Roman Britain, suggesting a continuity of power possibly linked to the former garrison. The fort has been subject to archaeological study since 1911, with major excavations by F.G. Simpson, Ian Richmond, Brenda Swinbank, and J.P. Gillam. Geophysical surveys from 1997 to 2001 confirmed the well-preserved sub-surface remains, while a 2000 excavation by Time Team explored the extramural settlement. A 2021 project by Newcastle University, Historic England, and English Heritage launched a major new excavation to further investigate the site. Today, Birdoswald Roman Fort is managed by English Heritage and operates as a visitor center, featuring exhibitions on Roman military life, the site's history, and key archaeological finds. The excavated remains of the fort are accessible, offering insights into one of the most extensively studied and best-preserved sections of Hadrian’s Wall.
circa 122 CE

Turret 51a (Piper Sike)
This was a stone tower built by the emperor Hadrian's army (which was most likely comprised of auxiliry troops drawn from provinces, under the command of a Roman) around 122 CE. It originally stood within the turf section of Vallum Hadriani, which extended 31 Roman miles (approx. 44 kilometers) from the river Irthing to Bowness-on-Solway. After a few years the turf was replaced by a stone wall, part of which abuts the turret's west wall. It was a smaller stone structure, originally spaced two for each Roman mile (approx. 1.48 kilometer) between larger milecastles. The archaeological finds from this turret-tower suggest that it may not have been used much after the second century CE. A reconstructed Roman-period watchtower (inspect) near the village of Grüningen is one possible design for Hadrian's Wall turrets, though clay tiles are less likely than slates or wooden shingles.


This work has been selected by scholars as being culturally important, and is part of the knowledge base of civilization as we know it. This work was reproduced from the original artifact, and remains as true to the original work as possible. As a reproduction of a historical artifact, this work may contain missing or blurred pages, poor pictures, errant marks, etc. Scholars believe, and we concur, that this work is important enough to be preserved, reproduced, and made generally available to the public.
See on Amazon
Signup for our monthly newsletter / online magazine.
No spam, we promise.
The Madain Project is an online archive of Abrahamic History and Archaeology.
Abrahamic History & Archaeology is the study of history and archaeology with respect to the three Abrahamic Faiths without considering the religious and theological aspects. The goal of Abrahamic History is to understand how and why the religious doctrines and behaviours have evlovled and changed over time. Searching for patterns in the evolution of significant cultural events such as the development of farming, the emergence of cities, or the collapse of major civilizations for clues of why and how these have influenced the three major Abrahamic religions.
Cloud Drive -
About -
Help -
Editorial Policy -
AI Policy -
Privacy Policy -
Contact
Madain Project: Encyclopedia of Abrahamic History & Archaeology.
Copyright MadainProject 2017 - 2026.
![]()
![]()
![]()
![]()
![]()
![]()