Tomb KV7 in the Valley of the Kings was the final resting place of Ancient Egyptian Pharaoh Ramesses II ("Ramesses the Great") of the Nineteenth Dynasty. It is located in the main valley, opposite the tomb of his sons, KV5, and near to the tomb of his son and successor, Merenptah, KV8. During antiquity the mummy of Rameses was relocated to the mummy cache in DB320, and the tomb was reused in the Third Intermediate and Roman periods for burials and by early tourists.
The tomb was built by Ramesses the second for himself, but he wasn't found to be buried here. KV7 follows the bent-axis plan of tombs of the earlier Eighteenth Dynasty. Unlike other tombs in the area, Tomb KV7 was placed in an unusual location and has been badly damaged by the flash floods that periodically sweep through the valley.
Tomb of Rameses II, the entrance to the fourth corridor which descends further into the tomb towards a vestibule and the burial chamber.
Tomb KV7, situated in the main wadi of the Valley of the Kings, ranks among the larger (spanning over an area of approx. 690 square meters) tombs in the area. It is positioned directly opposite Tomb KV5, which was constructed by Ramesses II for the burial of his sons. The entrance to KV7 is located at a relatively low point in the Valley, making it particularly susceptible to flooding. This vulnerability is evidenced by several instances of inundation, which have been preserved in the layers of debris fill within the tomb. As a result of these flood events, much of the wall decorations within KV7 have suffered significant damage or have been entirely lost over time. Despite this, a number of the original scenes from the tomb have been partially reconstructed through the careful analysis and restoration of surviving fragments, allowing for a partial understanding of the tomb’s original decorative program.

circa 1279 BCE- Present

Antiquity
The tomb's history also includes an episode of near-pillage, as depicted in the "Strike Papyrus" of the 29th year of Ramesses III. Following an attempted break-in, the mummy of Ramesses II was relocated first to the tomb of his father, Seti I, and later to the royal mummy cache in DB320. During the Third Intermediate and Roman periods, tourists left behind "abundant quantities" of potsherds in both the burial chamber and the nearby antechamber. Notably, Greek visitors, including individuals like "Herakleos, Echeboulos of Rhodes, Deilos, and a certain Se(l)aminion of Cyprus", carved their names into the walls of the first corridor, a practice reflecting the site’s attraction to foreign visitors.
The discovery of Ramesses II's body in the cache at Deir el-Bahari (DB320) suggests that the tomb was emptied at the end of the 20th Dynasty, around 1000 BCE. This event likely marks the time when the royal mummies were moved to the cache for safekeeping.
Modern Excavation and Conservation Efforts
The excavation and conservation of Tomb KV7 have been marked by several significant efforts, beginning with Christian Leblanc’s involvement in 1991 as part of a joint Franco-Egyptian mission. Leblanc’s research led to the determination that the construction of the tomb commenced before the end of Ramesses II’s second year on the throne and was completed within a span of no more than ten to twelve years.
In the early 19th century, efforts to clear the tomb of accumulated earth began. British consul Henry Salt initiated this work, followed by Jean-François Champollion in 1829, who also contributed to the excavation of the tomb’s interior. However, it wasn’t until 1844–1845, when Richard Lepsius conducted his own exploration, that significant strides were made in understanding the tomb’s layout. Lepsius was forced to crawl through parts of the tomb due to the depth of the accumulated debris. He managed to explore the accessible rooms, plan the underground complex, and document the walls, which had suffered extensive damage from silt and gravel. Lepsius’ work also included the first accurate plan of the tomb, and he postulated the existence of two additional rooms to the east of the pillared chamber (F), rooms that remained inaccessible at the time. His plan was later revised and expanded by the team of the Theban Mapping Project, based at the University of California, Berkeley.
In the early 20th century, significant excavation efforts were undertaken when Theodore Davis obtained the concession for excavations in the Valley of the Kings. Together with his photographer Harry Burton, Davis excavated Tomb KV7 between 1913 and 1914. These efforts were later continued by Howard Carter between 1917 and 1921, focusing not only on the interior of the tomb but also on the area surrounding it. During these excavations, important finds were uncovered, including the first remains of royal funerary furniture. Notably, some of these artifacts are now housed in major collections, including those of the Metropolitan Museum of Art in New York and the British Museum.
circa 1279 BCE
Entryway A
The entryway A of tomb KV7 is a divided stairway that descends from a hillside cutting near the valley floor, leading to gate B. The dimensions of entryway A are recorded as a width of 2.6 meters and a total length of 13.91 meters. The uppermost steps, which are visible today, are modern additions implemented to facilitate access, while the divided stairway itself is an original ancient feature. In recent conservation efforts, this ancient descent has been covered with carefully cut limestone blocks designed to replicate the original appearance and structural integrity of the passage. At the lower end of the stairway, just in front of gate B, there exists a pair of beam holes, which were historically used for lowering a sarcophagus into the tomb. The cross-beam was slightly longer than the width of the corridor. It fitted into the hole on one side of the corridor and the slot allowed it to be swung into position. it was used as an anchor point to lower heavy funerary articles down and into the inner chambers.
circa 1279 BCE
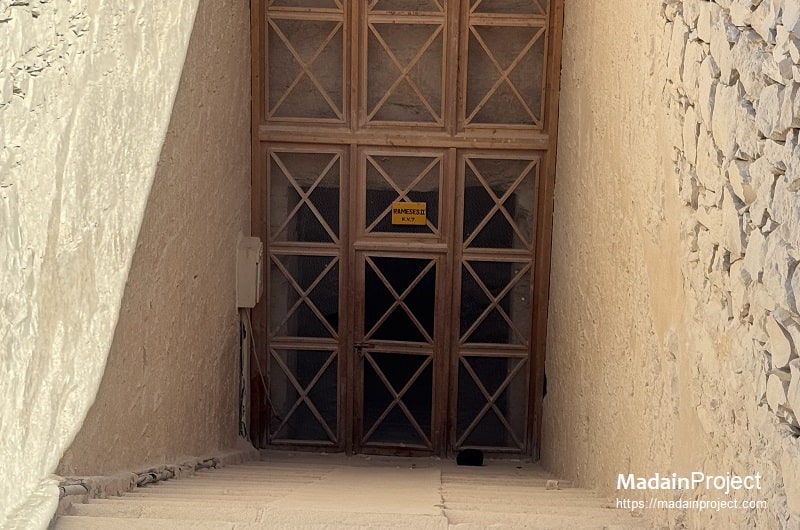
Gate B
Gate B of tomb KV7 is accessed via a series of steps leading from the descending stairway of entryway A. A modern wooden door is currently installed within the soffit, while a recess at the beginning of corridor B’s ceiling indicates that a large set of ancient wooden double doors once served to close off the gateway. The lintel above the entrance is notably decorated for the first time with a solar disk motif, flanked by the protective goddesses Nephthys and Isis, symbolizing divine protection and the solar journey.
The interior of the soffit is carved with beam slots that once held a wooden lintel, evidencing the use of structural wooden elements in the tomb’s construction. The reveals, or side surfaces of the doorway, feature representations of the goddess Ma’at, the personification of truth and cosmic order, kneeling above the heraldic plants symbolizing Lower and Upper Egypt—the papyrus and the lotus, respectively. The jambs, or upright sides of the doorway, are inscribed with the names and epithets of the reigning king interred within the tomb, affirming his divine and royal status.
The raised relief decoration on Gate B has suffered significant damage due to periodic flooding, which has plagued the tomb over centuries. Despite this damage, the architectural and artistic features provide critical insight into the craftsmanship and religious symbolism of the time. The dimensions of Gate B are recorded as 2.74 meters in height, 2.11 meters in width, and 1.05 meters in length.
circa 1279 BCE

Corridor B
The lower third of the sloping corridor, referred to as section B, exhibits a notable increase in the angle of descent. This steepened slope gives way to a divided stairway, which provides a change in the passage's vertical movement. At this transition point, two beam holes are carefully cut into the walls on either side of the corridor, suggesting a structural purpose or support feature. In addition to these architectural details, the corridor is embellished with raised relief decorations, which enhance its visual appeal and may have held symbolic or decorative significance during its construction. The overall dimensions of this section of the corridor are: a height of 2.82 meters, a width of 2.61 meters, and a length of 12.33 meters, offering a clear sense of scale and spatial design.
circa 1279 BCE
Gate C
Gate C of tomb KV7 features raised relief decoration that has been severely damaged as a result of recurrent flooding within the tomb. This gate serves as a continuation of the divided stairway that originates in corridor B, allowing for further descent into the burial complex. The architectural design indicates that the divided stairway, an essential structural element of the tomb’s layout, extends seamlessly through Gate C, maintaining the tomb's internal progression and spatial organization.
Despite the extensive damage, remnants of the original decorative elements provide valuable evidence of the tomb’s artistic heritage and the challenges posed by natural elements over time. The dimensions of Gate C are recorded as 3.38 meters in height, 2.07 meters in width, and 0.94 meters in length, reflecting its relatively narrow passageway as part of the tomb's intricate internal network.
circa 1279 BCE
Stairwell C
Stairwell C of the tomb KV7 is characterized by a gently sloping divided stairway that spans the entire length of the floor, continuing the architectural design seen in the preceding sections of the tomb. This divided stairway not only facilitates the descent deeper into the tomb but also reflects the deliberate planning and craftsmanship employed in the construction of the burial complex. Two trapezoidal niches, symmetrically positioned opposite each other in the central portion of the walls, serve as notable architectural features within the stairwell. The walls, once adorned with decorated plaster, would have contributed to the overall visual and symbolic richness of the tomb’s interior, though much of this decoration has since been lost due to the passage of time and environmental factors. Stairwell C measures 3.86 meters in height, 2.62 meters in width, and 7.37 meters in length, forming an integral part of the tomb's internal layout and descent system.
circa 1279 BCE
Gate D
The reveals of the gate-D are adorned with representations of the Four Sons of Horus, each symbolizing a distinct protective deity associated with the deceased in ancient Egyptian belief. The painted plaster decoration that once embellished this gate has suffered considerable damage due to flooding over time, obscuring much of its original detail. The gate measures 2.45 meters in height, 2.07 meters in width, and 1 meter in length, highlighting its substantial size within the architectural context of the tomb or structure it once graced.
circa 1279 BCE
Corridor D
A section of Corridor D in Tomb KV7 is moderately sloped, culminating in two steps that descend to a flat floor. The floor in this region was intentionally leveled to accommodate the outward-opening door or doors of Gate E, which is an atypical feature for Egyptian tombs, as most tomb doors traditionally open inwards. This unusual architectural design likely served both functional and symbolic purposes, allowing for easier access or enhancing the tomb’s ceremonial space. The original decoration in this area was executed in painted plaster; however, much of it has been lost over time, leaving behind only traces of the once-vibrant artwork.
circa 1279 BCE
Gate D
The reveals (vertical surfaces or jambs of the doorframe or entrance) of the gate are adorned with depictions of the Four Sons of Horus, each representing a protective deity in ancient Egyptian funerary practices. The painted plaster decoration on this gate has suffered significant damage due to flooding, obscuring much of the original imagery. The gate measures 2.45 meters in height, 2.07 meters in width, and 1 meter in length, indicating its considerable size within the tomb's architectural framework.
circa 1279 BCE
Gate E
The left (southwest) side of the gate features a lintel beam slot, which once supported either a large single wooden door or a pair of smaller double doors. The dimensions of this feature are 2.3 meters in height, 2.03 meters in width, and 1.01 meters in length, reflecting the size of the doorway and its structural components. This design would have allowed for secure closure of the gate, which was likely an important element of the tomb's entry system.
circa 1279 BCE
Well Chamber E
The well shaft, referred to as well-chamber E, has been cut through the floor of the chamber, though it remains partially filled with debris. The painted plaster decoration in the corridor has suffered significant damage due to flooding. The dimensions of the well-chamber are as follows: height 2.62 meters, width 4.15 meters, and length 3.65 meters.
circa 1279 BCE
Gate F
A pivot hole for a door (gate F) on the right (north-east) side of the gate indicates that a large wooden door was most likely used to close off this section of the tomb. The dimensions of the section with the door (gate F) are as follows: height 2.48 meters, width 2.04 meters, and length 1.12 meters.
circa 1279 BCE
Pillared Chamber F
Two pairs of pillars flank the central descent, which features a divided stairway. Most of the chamber on either side of the descent remains filled with debris, obscuring the wall decorations, which have been damaged by floodwater. The dimensions of the chamber are as follows: height 3.23 meters, width 8.4 meters, and length 8.4 meters.
circa 1279 BCE
Side Chamber Fa
The side chamber, designated Fa, contains unidentified decoration that has suffered significant flood damage. Four pillars stand at the center of the chamber. The dimensions of the chamber are as follows: width 7.78 meters and length 8.51 meters. This chamber provides access to another secondary chamber, designated Faa.
circa 1279 BCE
Side Chamber Faa
The chamber is filled with flood debris up to within 50 cm of the ceiling. There is no visible evidence of pillars, and the wall decorations have been badly damaged. The dimensions of the chamber are as follows: width 5.35 meters and length 3.33 meters.
circa 1279 BCE
Descent F
The descent from chamber F to gate G consists of a divided stairway, which leads from one section of the tomb to another. The stairway is an architectural feature that facilitates the transition between the chambers. The dimensions of this descent are as follows: a height of 2.78 meters, a width of 2.55 meters, and a length of 7.93 meters.
circa 1279 BCE
Corridor G
The surviving sections of the badly damaged painted plaster walls depict scenes from the Opening of the Mouth ritual, a key component of ancient Egyptian funerary practices. Other scenes feature Ramesses II standing before an altar, accompanied by priests performing ritualistic duties. The dimensions of this area are as follows: height 2.52 meters, width 2.58 meters, and length 8.54 meters.
circa 1279 BCE
Corridor H
The pivot holes in the gate indicate that there was once a door used to close off this corridor. The severely damaged remains of the painted plaster on the walls depict scenes from the Opening of the Mouth ritual, an important funerary ceremony in ancient Egypt. The dimensions of this section are as follows: height 2.38 meters, width 2.6 meters, and length 6.38 meters.
circa 1279 BCE
Gate I
Gate I is a compound gate, and the door pivot holes indicate that there was once a single wooden door used to close off this section.
circa 1279 BCE
Chamber I
The chamber I marks a shift in the tomb's axis, turning 90° from the original orientation. The painted plaster in this chamber has suffered significant damage over the millennia due to flooding. The dimensions of the chamber are as follows: height 2.05 meters, width 7.28 meters, and length 5.74 meters.
circa 1279 BCE

Burial Chamber J
The burial chamber has a sunken central area and a vaulted ceiling. Much of the decoration has been damaged beyond repair – its section of the Valley is particularly susceptible to flash floods – but it would have been decorated with the standard Book of Gates, Amduat and Litany of Ra.
Four pillars lie on either side of the sunken floor and the vaulted ceiling of the burial chamber (designated J). The decoration in this chamber was painted onto a plaster surgace, all have been damaged. traces of decoration on some pillar faces indicate that the sides facing the sunken center of the chamber were decorated with djed pillar designs. the other faces were decorated with representations of ramesses ii and deities. there are niches for magic bricks in the walls
there is a recess in the floor, possibly for a chest of canopic jars. only fragments of the clacity sarcophagus were found, and there were no traces of any other stone sarcophagus. the discovery of a pair of painted limestone lion heads during excavations of the burial chamber suggests that the sarcophagus was placed on a limestone lion bed.
circa 1279 BCE

Relief Carvings
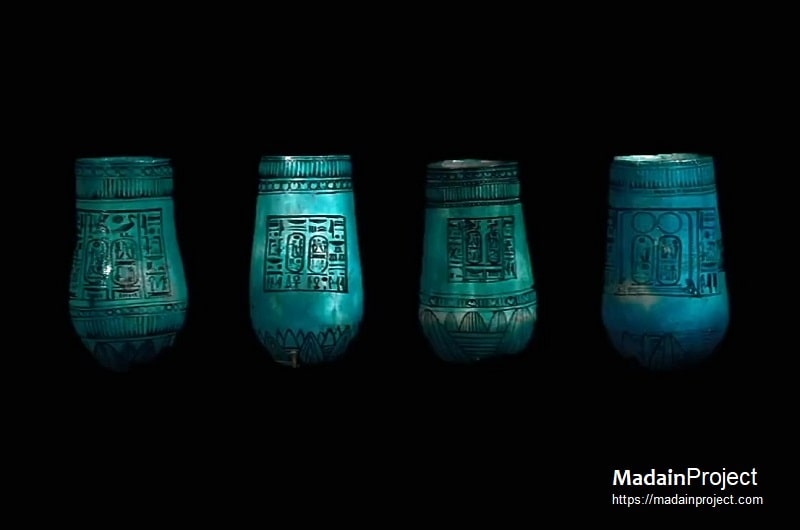
Decorations inside the KV7 consist of scenes from the Book of the Gates, Book of the Dead, Book of the Heavenly Cow, Imydwat, Litany of Ra, Opening of the Mouth Ritual. Also, scenes of the king and deities were seen with representations of many funerary objects in the burial chamber. Only a few pieces of funerary equipment were found in the tomb, including few wooden shabtis, a damaged cast bronze shabti, fragmentary Oshabty, fragments of statues, fragments of faience, bits of glass, calcite and limestone lids of vessels, among other fragments.
circa 1279 BCE
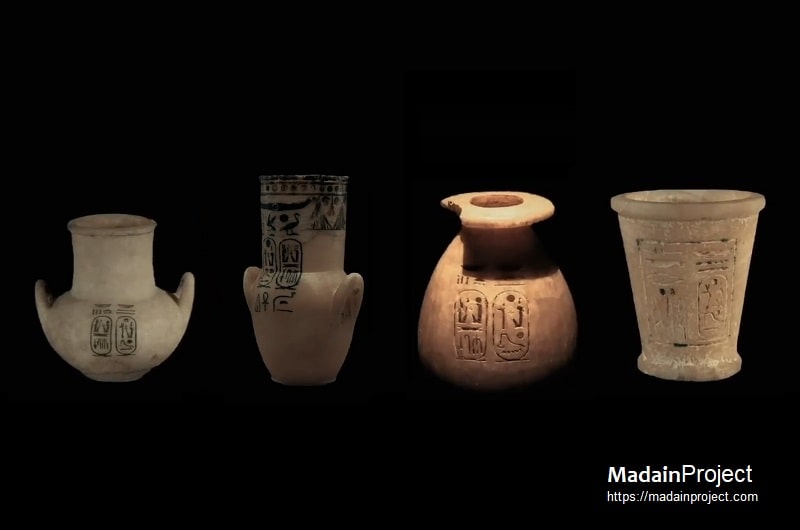
Tomb KV7 was looted thoroughly in antiquity and severely damaged by flash flooding over the centuries. Consequently, few substantial artifacts survived in situ. However, excavators and earlier explorers did recover some fragmentary and displaced items: fragments of the king’s alabaster sarcophagus lid, ushebti (shabti) figurines bearing the king’s name and titles, pieces of faience (inspect), glass, and carved stone and alabaster vessels, fragments of wall decoration and painted plaster, and some inscribed doorjambs and architectural elements with the king’s names and epithets. Because the tomb suffered repeated floods, most of the burial equipment was long since swept away, and many of the remaining small finds were dispersed across the floor of the tomb. Early explorers like Henry Salt and Richard Pococke documented some small items, but systematic modern archaeological work (notably by Christian Leblanc’s team) has mostly uncovered small fragments and debris rather than complete, intact grave goods.
In addition to the evidence of early looting and damage at the tomb itself, historical accounts and modern scholarship indicate that most of the significant grave goods from KV7 were stripped away in antiquity. Over the centuries, these pieces—originally intended for Ramesses II’s eternal use—were often recycled or repurposed by later individuals seeking to invoke the prestige of the great pharaoh in their own burials or monuments. This process scattered much of the funerary material across other tombs and contexts, and a small number of inscribed fragments eventually entered European and international antiquities collections. Today, any surviving elements that can be securely linked to KV7 are extremely rare, and those that do exist in museum holdings are usually fragmentary and difficult to recognize as part of the tomb’s original assemblage. This situation underscores the complexity of reconstructing the material culture of a royal burial that suffered such thorough plundering and centuries of environmental damage.

Signup for our monthly newsletter / online magazine.
No spam, we promise.
The Madain Project is an online archive of Abrahamic History and Archaeology.
Abrahamic History & Archaeology is the study of history and archaeology with respect to the three Abrahamic Faiths without considering the religious and theological aspects. The goal of Abrahamic History is to understand how and why the religious doctrines and behaviours have evlovled and changed over time. Searching for patterns in the evolution of significant cultural events such as the development of farming, the emergence of cities, or the collapse of major civilizations for clues of why and how these have influenced the three major Abrahamic religions.
Cloud Drive -
About -
Help -
Editorial Policy -
AI Policy -
Privacy Policy -
Contact
Madain Project: Encyclopedia of Abrahamic History & Archaeology.
Copyright MadainProject 2017 - 2026.
![]()
![]()
![]()
![]()
![]()
![]()